
Author: Matt Spitzer | Updated August 2026
You just spent months getting your plants to harvest, and the way you dry and cure cannabis after the chop decides whether that work pays off or gets wasted in the last two weeks. None of it requires a lab. Most of the risk comes down to two easy-to-make mistakes: drying too fast and skipping the cure.
How to Dry and Cure Cannabis: The Short Version
If you just want the steps without the reasoning behind them, here they are. The sections below explain why each one matters.
- Trim first. Remove large fan leaves before hanging (wet trim) or after the buds are dry (dry trim). Either works; wet trim dries a bit faster since less leaf mass is blocking airflow.
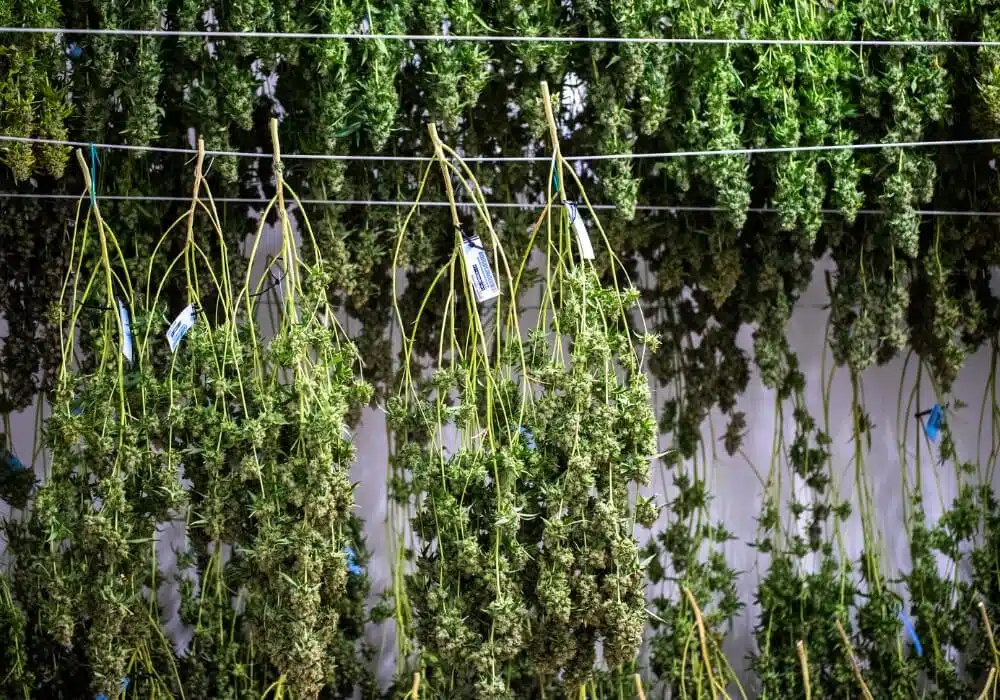
- Hang branches or whole plants upside down in a dark space, spaced apart so air can move around each one.
- Hold the room at 60 to 70 degrees F and 55 to 65 percent relative humidity, with gentle, indirect airflow.
- Check daily starting around day 5. Bend a small stem. It is ready when the stem snaps instead of bending, usually with the buds sitting around 8 to 11 percent internal moisture.
- Move buds into jars, filled about two-thirds full, and seal them.
- Burp jars once or twice a day for the first one to two weeks. An ammonia smell means too much moisture; keep burping. A crumbly texture means too little; ease off.
- Keep curing at 58 to 62 percent relative humidity for at least two to four weeks. You hold that range through burping (step 6) and by watching a small hygrometer in the jar, or by dropping in a 58 to 62 percent two-way humidity pack, which regulates itself and needs far less monitoring. Longer cures, four to eight weeks or more, keep improving flavor and smoothness.
- Store finished jars sealed, cool, and dark. Properly cured flower holds its quality for months, and up to about two years if storage stays consistent.
Table of Contents
- The Simple Version
- Why Drying Too Fast Backfires
- Lessons From Other Hang-Drying Industries
- Why Heat Destroys Terpenes
- Setting Up Your Dry
- How to Know When It Is Dry Enough
- Curing: Why the Jar Matters
- Burping Your Jars
- Tech-Heavy Options for Curing
- Common Post-Harvest Mistakes
- FAQ
Keep It Simple
Cannabis does not require complicated equipment to dry and cure. Cut your plants down, hang them upside down somewhere dark, and wait until the stems snap instead of bend. Cut the buds off, drop them in a jar, and you have flower. Growers have done it this way for a long time and it works.
Where people lose quality is in the details of that process. There is real science behind why professional growers control temperature, humidity, and airflow so tightly during dry and cure, and understanding it will change how you handle your own harvest even if your setup stays simple.
Why Drying Too Fast Backfires
This idea comes from outside cannabis entirely. Food scientists and lumber dryers ran into the same problem long before cannabis growers did: dry the outside of something too quickly, and it forms a barrier that seals moisture inside.
In cannabis, this is often called case hardening. The outer layer of the bud loses moisture fast because it is directly exposed to air, but the internal stem and denser inner tissue hold onto water much longer. If the outside dries and hardens before the inside catches up, that outer layer traps moisture inside the bud. From the outside, the bud can feel dry, even papery. Inside, it is still damp.
That trapped moisture is exactly what mold needs. A bud that feels crispy on the outside can still develop mold or mildew from the inside out weeks later, in a sealed jar, when nobody is checking. Slowing the dry down, using lower airflow and higher humidity than instinct tells you to, is what prevents this from happening in the first place.
Pro tip: Make sure there is good airflow in your drying space but try not to point the airflow directly at the drying plants.
Lessons From Other Hang-Drying Industries
Cannabis growers did not invent slow, controlled hang drying, and case hardening is not a cannabis-specific problem. Two older industries ran into the exact same issue and solved it the same way.
Dry-cured meat is the closest parallel. Salami, coppa, and other charcuterie are hung to dry in a chamber held around 50 to 60 degrees F and 70 to 80 percent relative humidity, with gentle airflow. Meat curers describe case hardening in almost identical terms to cannabis growers: the outside seals before the inside catches up, moisture gets trapped, and the product spoils from the inside out weeks later even though the exterior looks and feels done. Their fix is the same one that works for buds: keep humidity higher than instinct suggests, keep airflow gentle instead of direct, and give it time.
Tobacco curing offers a second parallel, on a much larger scale. Burley tobacco is air-cured by hanging it in barns for four to eight weeks, and growers there fight the same battle with airflow and spacing. Tobacco extension guides specifically recommend spacing sticks of tobacco apart on the barn rail so leaves do not overlap, because overlapping leaves trap humidity at the contact points and cure unevenly, the same reason we recommend spacing branches apart in your dry space. Tobacco curers also lean on a wet-bulb thermometer, a tool that reads how fast moisture is actually leaving the leaf, rather than relying on a dry-bulb temperature reading or a guess.
The common thread across all three industries is that nobody speeds this process up for free. Every shortcut that pushes moisture out of a plant or animal product faster than it can move from the inside to the outside creates a shell that causes problems later. Patience is the actual technique.
Why Heat Destroys Terpenes
Terpenes are the aromatic compounds responsible for the smell and flavor of your buds, and they are volatile. That means they evaporate easily, especially with heat. Run a fan directly on your buds, dry in a warm room, or try to speed things along with added heat, and you will drive off the terpenes right along with the water.
The result is flower that dries fast but ends up smelling and tasting like hay instead of the strain you grew. This is one of the most common ways new growers accidentally ruin an otherwise good harvest. There is no way to get those terpenes back once they are gone, so the goal during drying is always the slowest pace your patience and setup allow, at cool temperatures, out of direct light and away from heat sources.
Pro tip: Try to keep your drying space below 68 degrees if possible to avoid terpene loss.
Setting Up Your Dry
The target range most experienced growers work within is 60 to 70 degrees F and 55 to 65 percent relative humidity, in a dark space with slow, indirect airflow. Direct airflow on the buds themselves accelerates surface drying and increases the risk of case hardening described above.
A cheap digital hygrometer is worth having in your dry space so you are working from a real number instead of a guess. If your space runs too dry, a humidifier or a few open containers of water in the room can help bring humidity up into range. If it runs too humid, a small fan pointed at the room (not the buds) and some airflow through the space will help.
Hang whole branches or plants upside down with enough spacing between them that air can move around each one. Crowding branches together restricts airflow and creates pockets of trapped humidity, which raises mold risk in exactly the areas you cannot see. Whether you trim off the large fan leaves before hanging (wet trim) or wait until the buds are dry (dry trim) is mostly a matter of preference. Wet trimming exposes more bud surface to airflow and tends to dry a little faster, while dry trimming is slower but some growers find it easier on the hands since the leaves have stiffened up. We cover a full breakdown of gear that works well for a dry and cure setup on our growing gear page, including hygrometers and the humidity control tools we use ourselves.
How to Know When It Is Dry Enough
Skip the guesswork and use the snap test. Take a small stem, not the thick main stem, and bend it. If it bends without breaking, it is not ready. If it snaps cleanly, the outer bud is dry enough to move into jars. Buds at this point typically sit around 8 to 11 percent internal moisture, dry enough to resist mold but not so dry that they crumble.
Most harvests take somewhere between 7 and 14 days to reach this point, depending on bud density, room humidity, and airflow. Dense, large colas take longer than smaller popcorn buds, which is part of why the curing step matters so much, covered next.
Curing: Why the Jar Matters
Even after a careful, slow dry, your harvest is not uniform. Big colas and small buds do not dry at the same rate, so by the time your stems are snapping, you likely have a mix of buds that are slightly overdried on the outside and buds that are still a touch underdried, sitting side by side on the same branch.
This is what curing solves. When you pack buds of different sizes into a sealed jar together, moisture naturally moves from wetter buds to drier ones until the whole batch reaches the same equilibrium. The bigger buds give up a little moisture, the smaller ones pick some up, and after a few weeks in the jar the whole harvest is far more consistent than it was the day you jarred it.
Curing also gives chlorophyll and other plant compounds time to break down, which is a big part of why cured flower smokes smoother and tastes better than flower that goes straight from hang-dry to use. A properly cured jar should feel like it is holding flower at roughly 62 percent relative humidity, the same target used by two-way humidity packs made for this exact purpose.
Burping Your Jars
Fill jars about two-thirds full so air can circulate around the buds, not packed to the top. For the first one to two weeks, open each jar once or twice a day for a few minutes. This is called burping, and it lets built-up moisture and gas escape while giving you a chance to check for any smell of ammonia or mustiness, both signs that moisture is still too high.
After the first couple of weeks, burping once every few days is usually enough, and a lot of growers keep curing for a month or more before considering the batch finished, since flavor and smoothness keep improving well past the point where it is technically dry. If the daily schedule is not something you will actually stick to, a passive curing bag like Grove Bags handles that moisture and gas exchange on its own, covered in the tech-heavy options below.
Tech-Heavy Options for Curing
Hanging in a dark closet with a hygrometer works fine, but it is not the only option if you want more consistency or less manual monitoring, especially if your space does not hold a stable temperature and humidity on its own.
Automated drying and curing cabinets. Units like the Cannatrol Cool Cure are built specifically to take the guesswork out of this process. Instead of just tracking relative humidity, they control dew point, which lets the cabinet manage moisture removal from the plant more precisely than a simple humidifier or dehumidifier can. Wet flower goes in, and the cabinet runs the entire dry and cure cycle, typically over roughly a week, before the flower comes out ready to store. The tradeoff is cost and capacity. These cabinets are priced for growers processing at least a couple of pounds of wet flower per harvest, and they make the most sense for someone without a dedicated dry space or who has struggled to hold a stable environment with hang drying alone.
Humidity packs sized for totes. If a cabinet is more than you need, two-way humidity packs (Boveda and Integra Boost are the two common brands) scale up past the jar method. Instead of jars, growers use large sealed totes or bins, sized to hold enough packs to control the air volume inside, not the weight of the flower. A handful of larger packs distributed through a tote works the same way a single pack works in a jar, holding the space at 58 to 62 percent relative humidity and buffering it against swings. This is a middle ground: cheaper and simpler than an automated cabinet, but it still needs the same burping routine as jars, since it is a passive system rather than an active one.
Curing bags that skip burping entirely. Grove Bags, built with a film they call TerpLoc, take a different approach. Instead of a rigid container you have to manually vent, the bag film itself is permeable enough to let excess moisture and gas pass out passively, which holds the inside around that same 58 to 62 percent relative humidity target without you opening it. Dry your buds down to around 10 to 12 percent moisture first, load the bag about three-quarters full to leave headspace, and seal it. No daily burping required. It is a real convenience if you hate the burping schedule or tend to forget it, though it costs more per pound than a mason jar and, like the tote method, still depends on a properly slow dry before the buds ever go in the bag.
Automated burping devices. If you like curing in your own jars, barrels, or totes but want the monitoring and burping handled for you, a device like Cure Puck sits inside the container instead of replacing it. It tracks humidity, CO2, and temperature in the headspace along with the room around it, then vents the container automatically when conditions call for it, rather than on a fixed daily schedule. That matters because introducing air that is too dry or too humid during a manual burp can undo the very balance you are trying to hold. It is a middle path between the fully manual jar method and a closed system like Cannatrol or Grove Bags: you keep your existing containers, but the guesswork around when and how much to vent goes away.
None of these four replaces a careful dry. Loading wet, undried flower into a tote, cabinet, curing bag, or automated container is a fast way to grow mold. All of them are best thought of as tools for the curing and storage stage, or as a way to remove the guesswork from an unstable room, not a shortcut around the drying process itself.
Common Post-Harvest Mistakes
- Drying too hot or too fast to save time, which risks case hardening and strips terpenes.
- Skipping the cure entirely and smoking or storing straight from the dry rack, which leaves moisture uneven across the batch and flavor underdeveloped.
- Packing jars too full, which limits the airflow the cure depends on.
- Not burping jars early on, which lets trapped moisture turn into mold in a sealed container.
- Drying in a bright or high-traffic room, where light and heat both work against you.
FAQ
How long should I dry cannabis before jarring it? Most harvests are ready to jar somewhere between 7 and 14 days after hanging, once small stems snap cleanly instead of bending. Bud size, room humidity, and airflow all affect the exact timeline.
What humidity should I cure cannabis at? Aim for buds that hold around 62 percent relative humidity inside the jar. Two-way humidity packs are built around this exact target and are an easy way to stay in range without constant monitoring.
Can I skip curing and just dry my buds? You can, and plenty of home growers do, but skipping the cure leaves moisture levels uneven across the harvest and cuts short the process that smooths out flavor and smoke quality. A few weeks of curing makes a noticeable difference.
Why does my dried cannabis smell like hay? This is almost always heat exposure during drying, whether from a warm room, direct airflow, or added heat to speed things up. Terpenes evaporate easily, and once they are gone they do not come back.
How do I know if my buds have mold instead of just being dry? Mold often shows up as a grayish, white, or fuzzy coating, sometimes with a musty or ammonia-like smell when jars are opened. If you see or smell anything like that, remove the affected buds and check the rest of the batch closely.
How long does cured cannabis stay good? Properly cured flower, sealed and stored cool and dark, holds its quality for months. Many growers see little noticeable loss for up to about two years if the container stays sealed and storage conditions stay consistent.
Ready to grow something worth curing properly? Browse our seeds or check out our growing gear page for the tools we use for our own dry and cure.

Matt, Co-Founder of Triangle Seeds – Matt has been growing commercially since 2013 alongside co-founder Chase. Over a decade, Triangle Seeds has sold over a million seeds to home growers and hemp farmers across the US. We ship nationwide. Call/text (919) 410-6945. Learn more
We have a video series with cannabis content creator Catherine Goldberg, aka Senior Savvy Cannabis, where we guide her through her first indoor grow. If you are a new grower, you might find the videos helpful. Watch the grow videos →