")
Author: Matt Spitzer | Updated June 2026
I’ve been germinating cannabis seeds since 2006. Before we started Triangle Seeds, Chase and I ran a commercial hydroponic vegetable farm and were germinating thousands of lettuce, basil and tomato seeds every week. When we made the switch, we brought that same attention to the germination process with us. This post covers how to do it right, and what to check when things go wrong. For the full interactive step-by-step, see our germination guide.
Quick Answer
| Question | Answer |
|---|---|
| Best method for photoperiod seeds | Paper towel with H2O2 pre-soak |
| Best method for autoflower seeds | Direct pot, no paper towel |
| Alternative method for both | Potting mix with vermiculite top layer |
| How long until taproot appears | 2–7 days after soak |
| Soak/paper towel temp | 70–80°F |
| Autoflower pot temp | 70–80°F |
| Can I plant outside directly | No, you shouldn’t unless it is under a protected row cover or plastic hoop |
Table of Contents
- What You Need
- Step-by-Step: How to Germinate Cannabis Seeds
- Why Seeds Fail to Germinate
- After Your Seeds Sprout
- Frequently Asked Questions
What You Need
For all methods:
- 3% hydrogen peroxide (drugstore first-aid aisle, under $2)
- Filtered water (Brita or similar, not unfiltered tap)
- Spray bottle
For the paper towel method (photoperiods):
- Paper towels
- Container with a lid
- Warm, dark spot that holds 75–80°F
For autoflowers (direct pot method):
- 3+ gallon final pot filled with quality soil and fertilizer
- Clear solo cup or cut plastic bottle (humidity dome)
- Warm spot at 70–80°F
For the vermiculite method (both seed types):
- Quality potting mix
- Vermiculite (fine or medium grade)
- Container or final pot (solo cup for photoperiods, 3+ gallon for autoflowers)
- Spray bottle
- Warm spot at 70–80°F
Step-by-Step: How to Germinate Cannabis Seeds
Step 1: The H2O2 Soak
This is the step most guides skip, and it makes a real difference.
Mix 1 part 3% hydrogen peroxide with 6 parts filtered water. Drop your seeds in and let them soak for 24 hours (12 hours for autoflowers). The H2O2 kills surface bacteria and fungi, adds oxygen to the embryo, and softens the shell. Germination rates go up noticeably compared to a plain water soak.
After the soak, drain the seeds. Don’t rinse them.
Step 2: Choose Your Method Based on Seed Type
This is where a lot of new growers make their first mistake. The method depends entirely on what kind of seeds you’re germinating.
Photoperiod seeds: paper towel method
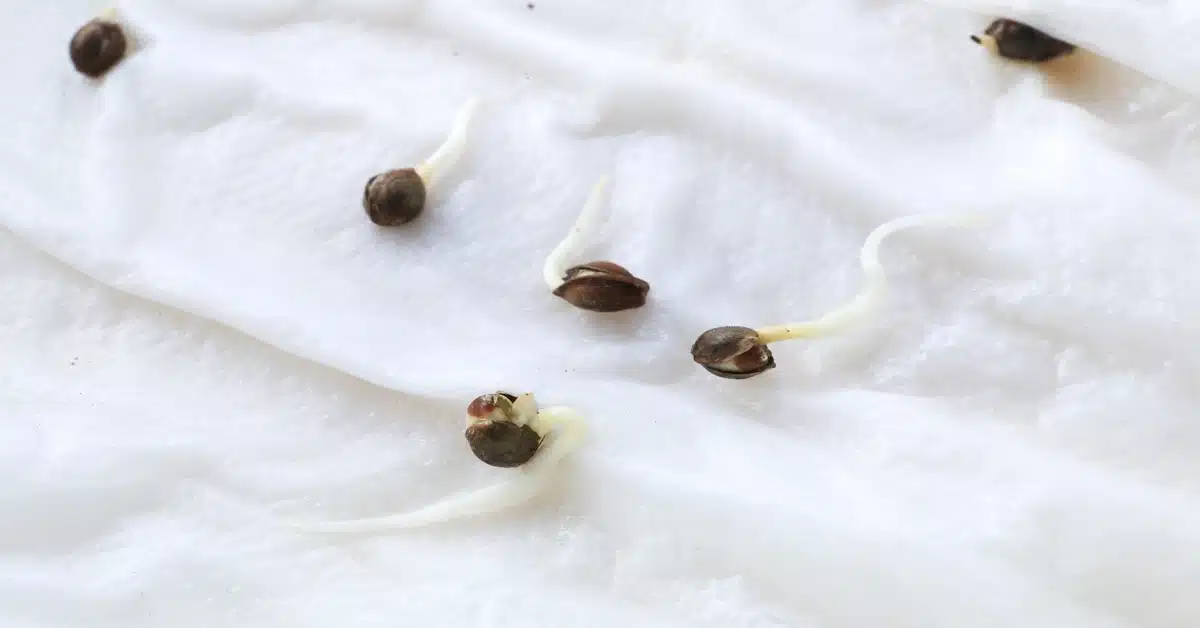
Dampen a paper towel with filtered water (moist, not dripping). Lay it flat in a container. Place your seeds on the towel with at least an inch of space between each one. Cover with a second damp towel. Close the container and keep it in a warm, dark spot at 75–80°F.
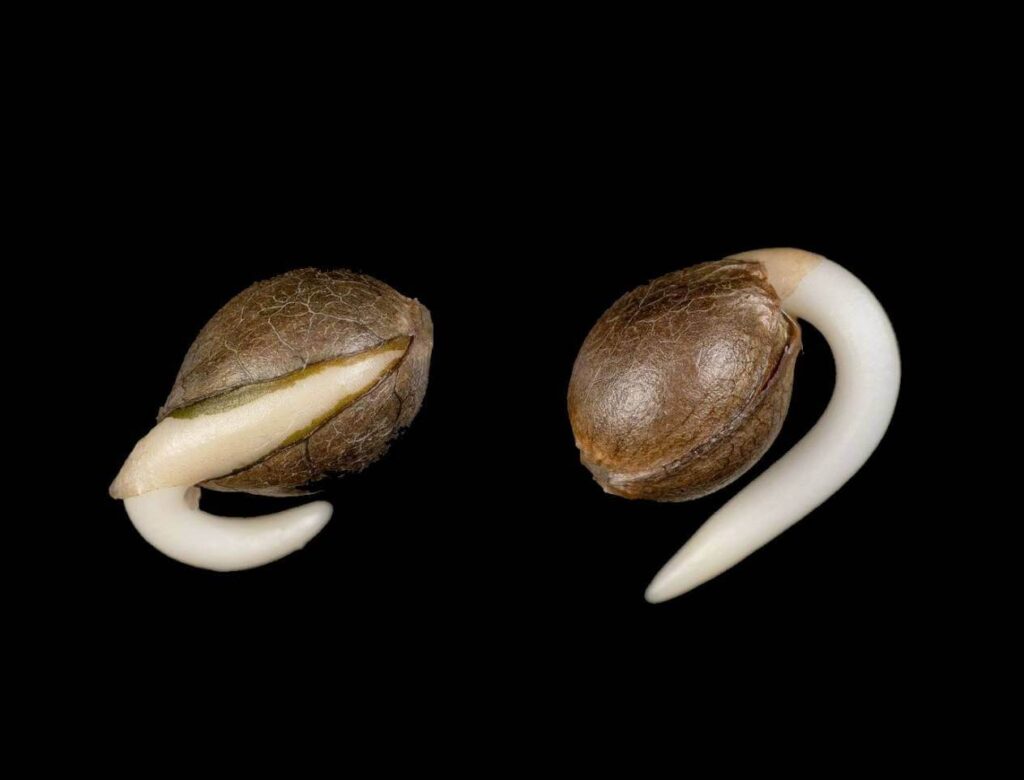
Check daily. Re-moisten the towel if it starts to dry out. Once the taproot reaches between ¼ and ¾ inch (usually 2–7 days), it’s time to plant. Root facing down, handled as little as possible.
Don’t let the taproot go past ¾ inch. It gets fragile and breaks easily during transplanting.
Autoflower seeds: direct pot method
Do not use the paper towel method for autoflowers. Ever.
Autoflowers flower based on age, not light. They start the clock the moment they sprout. Any root disturbance during their first few weeks can trigger early flowering before the plant has had time to grow. The result is a stunted plant with a fraction of the yield it should have had.
After the 12-hour soak, plant the seed directly into its final 3–5 gallon pot. Make a ½ inch hole in the center, drop the seed in, cover lightly, and mist the surface. Put a clear solo cup or cut plastic bottle over it as a humidity dome. Keep in a warm spot at 70–80°F. Sprout will appear in 5–10 days. Remove the dome once the seedling is standing on its own.
That pot is permanent. You don’t transplant autoflowers. Not once, not ever.
Vermiculite method (works for both seed types)
This is my personal favorite for new growers who want something more forgiving than paper towel but less commitment than going straight into a final pot.
After the H2O2 soak (24 hours for photoperiods, 12 for autoflowers), fill a small container or solo cup with a quality potting mix and moisten it evenly. Make a ½ inch hole in the center. Drop the seed in, then fill the hole with dry or barely damp vermiculite instead of potting mix.
Vermiculite is extremely lightweight and has almost no resistance, so the seedling pushes up through it without effort. It also holds just enough moisture around the seed without compacting or forming a crust the way soil can. Sprouts tend to emerge faster and more consistently than with a straight soil cover.
Keep the container at 70–80°F. Mist the vermiculite surface daily to keep it from drying out. Sprout will appear in 4–7 days.
If you’re growing photoperiods in a small starter pot/cup, transplant once the roots fill the container as normal. If you’re using this method for autoflowers, make sure you’re starting in the final 3–5 gallon pot from day one. The vermiculite top layer doesn’t change the no-transplant rule.
Step 3: Never Plant Directly Outside
I see this one a lot. Someone wants to skip the indoor germination step and just put the seed in the ground.
Don’t do it. Germination rates drop significantly when you plant directly outside. Temperature swings, pests, dry spells: too many variables outside your control. Always start indoors and transplant once the seedling is established.
Why Seeds Fail to Germinate
Even with a solid method, things can go wrong. Here’s what I see most often and how to fix it.
The paper towel dried out
This is the number one cause of germination failure. The towel needs to stay consistently moist: not soaked, but never dry. If you check once a day and it’s dried out, you may have already lost the seed. Check twice a day once you see activity.
Temperature was too low
For the paper towel method, seeds germinate best at 75–80°F. For the direct pot autoflower method, 70–80°F is the target range. Below 70°F and things slow down significantly for either method. If your space runs cool, put the container on top of a refrigerator or use a seedling heat mat.
Tap water with chlorine
Unfiltered tap water contains chlorine, which inhibits germination. Use filtered water for everything: the soak, dampening the towel, and watering after planting. A basic Brita pitcher is all you need.
Taproot was too long before planting
Once the taproot gets past ¾ inch it becomes fragile. A lot of new growers wait until they see a long root thinking that means the seed is “more ready.” It’s not. Plant it between ¼ and ¾ inch.
Autoflower was transplanted
If you germinated an autoflower in a solo cup or paper towel and then transplanted it, that’s likely why it’s struggling. There’s no recovery from this. The best you can do is minimize further stress and hope the plant has enough time to recover before it starts flowering.
Seeds were old or stored poorly
Seeds stored in a warm, humid environment lose viability fast. If your seeds are more than two years old or were stored in a bathroom or garage, low germination rates may just be the reality. We only ship seeds we’d plant ourselves, and we recommend using them within a year of purchase for best results.
The seed was a dud
It happens. Even from good stock, a small percentage of seeds simply won’t germinate. That’s why we offer a germination guarantee. If you follow our method exactly and your seeds don’t sprout within 14 days, we’ll send replacements. See guarantee details and eligibility here.
After Your Seeds Sprout
Germination is just the start. The first three weeks are critical.
Days 1–7: Keep things gentle. Eighteen hours of light, not too intense. Soil moist but not wet. Temperature 70–80°F, humidity 75% or higher. A vented humidity dome helps hold moisture without suffocating the seedling.
Days 7–21: Start strengthening the plant. Gradually increase light intensity. Add a small fan for airflow (it builds stronger stems). Start nutrients at 75% strength and work up to 100% by day 21.
Around day 21 (photoperiods only): Once roots fill the current container, transplant up to a 4-inch pot or larger. Handle roots gently and get the plant back under light as quickly as possible.
If you’re growing autoflowers, skip the transplant step entirely. They stay in their final pot from day one. For everything that comes next, see our full how to grow cannabis guide.
Thinking about growing but not sure what gear to buy? Check out this list of growing supplies we recommend.
Frequently Asked Questions
How long does it take to germinate cannabis seeds? Most cannabis seeds show a taproot within 2–7 days after the H2O2 soak using the paper towel method. Direct-pot autoflowers typically sprout in 5–10 days.
Can you germinate cannabis seeds in water only? You can, but we don’t recommend it. A plain water soak doesn’t clean the seed surface or provide the extra oxygen that hydrogen peroxide does. Germination rates are consistently lower.
Do cannabis seeds need light to germinate? No. Seeds germinate best in the dark. Light is only needed after the seedling has broken the soil surface.
What’s the best soil for germinating cannabis seeds? A light, airy seedling mix with good drainage. Avoid heavy potting soils with slow-release fertilizers (they can burn seedlings). We like starting mixes with a neutral pH around 6.0–6.5.
How do I know if a cannabis seed is viable before germinating? Healthy seeds are firm, dark brown, and sometimes have a slight tiger-stripe pattern. Pale, soft, or cracked seeds are less likely to germinate. The float test (dropping seeds in water) is sometimes used, but it’s not reliable. We recommend just starting the soak and seeing what happens.
Where can I buy cannabis seeds that actually germinate? We ship feminized cannabis seeds, THC seeds, and CBD seeds nationwide from our shop at Triangle Seeds. Every order comes with our germination guarantee. Browse our seeds here.
About the Author

I’m Matt, co-founder of Triangle Seeds. I’ve been growing commercially since 2013 and started Triangle Seeds in 2017 with my business partner Chase. We ship seeds nationwide. Call or text me at (919) 410-6945. Learn more about Triangle Seeds.
This post contains affiliate links. As an Amazon Associate I earn from qualifying purchases.